A LITTLE GUIDANCE. A LOT LESS GUESSWORK.
Tickabee Docs
From your first draft to your next scheduled week. Learn the Tickabee way, one step at a time.
Updated 5 November 2026
GUIDE 01
Get started
Your first post, from draft to published.
- Open Tickabee, create your account and verify your email.
- Open Hives. Choose your brand workspace and add its description, audience and tone.
- Open Channels in that Hive and connect a social account you manage.
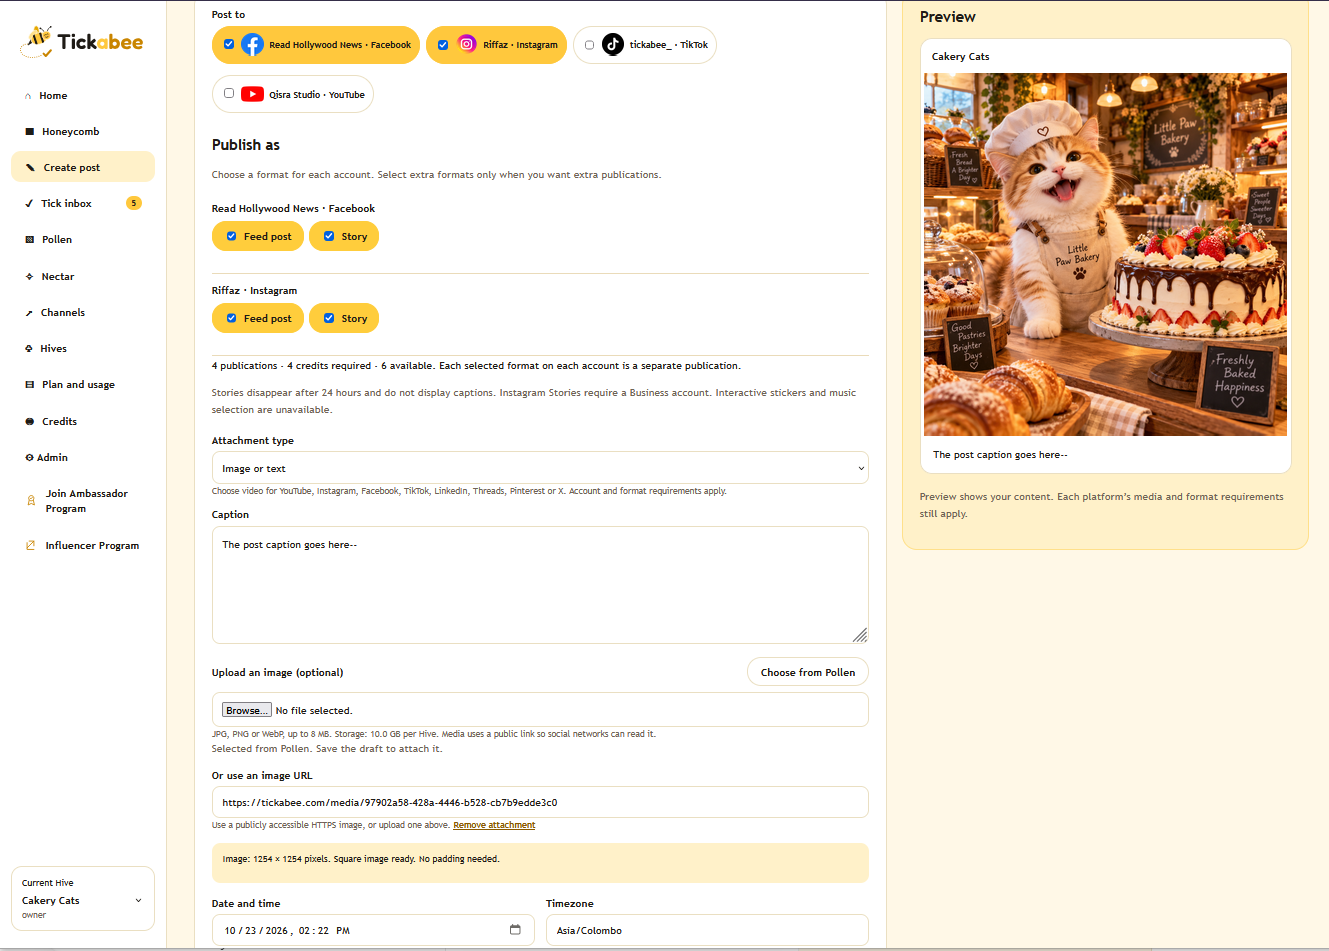
- Open Create post. Write a caption, choose a destination and add media if the selected format needs it.
- Save your draft. Review the actual saved caption, attachment, destination, time and credit cost.
- Choose Tick and schedule for a future time, or Post now to publish immediately. Check the final result for each destination.
GUIDE 02
Hives and connected accounts
Keep every brand in its own workspace.
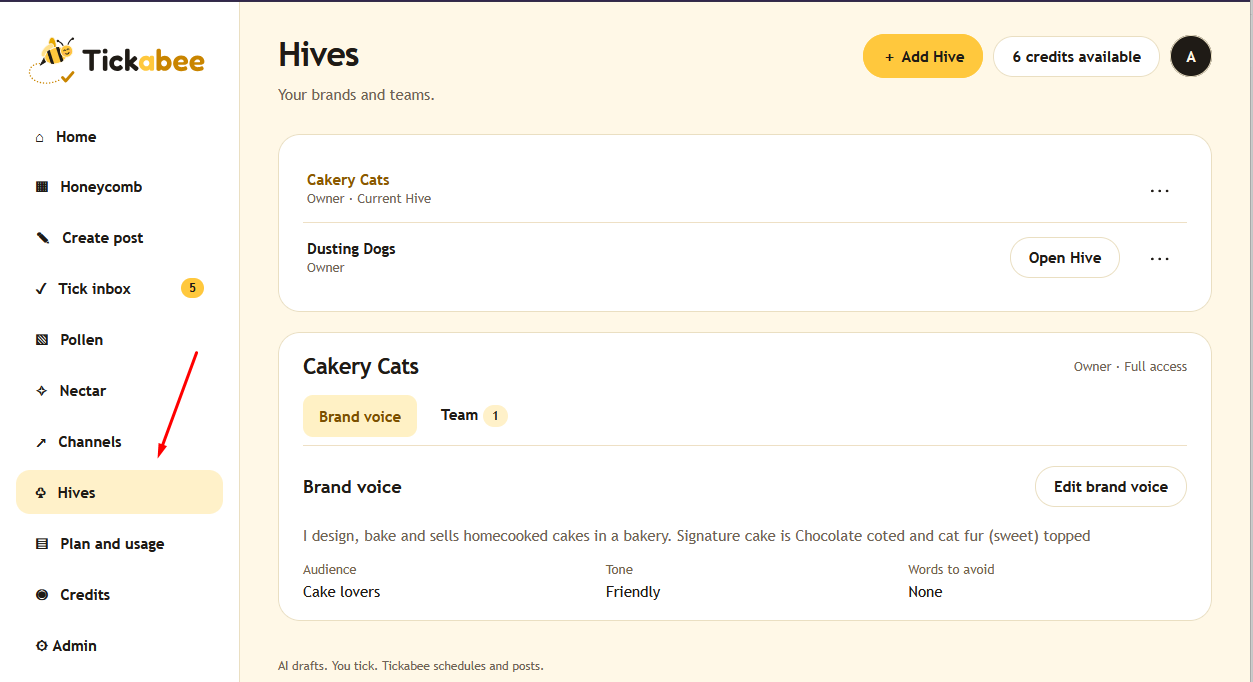
A Hive is a brand workspace with its own voice, connected social accounts, drafts and team. Check the current Hive before connecting accounts or creating content.
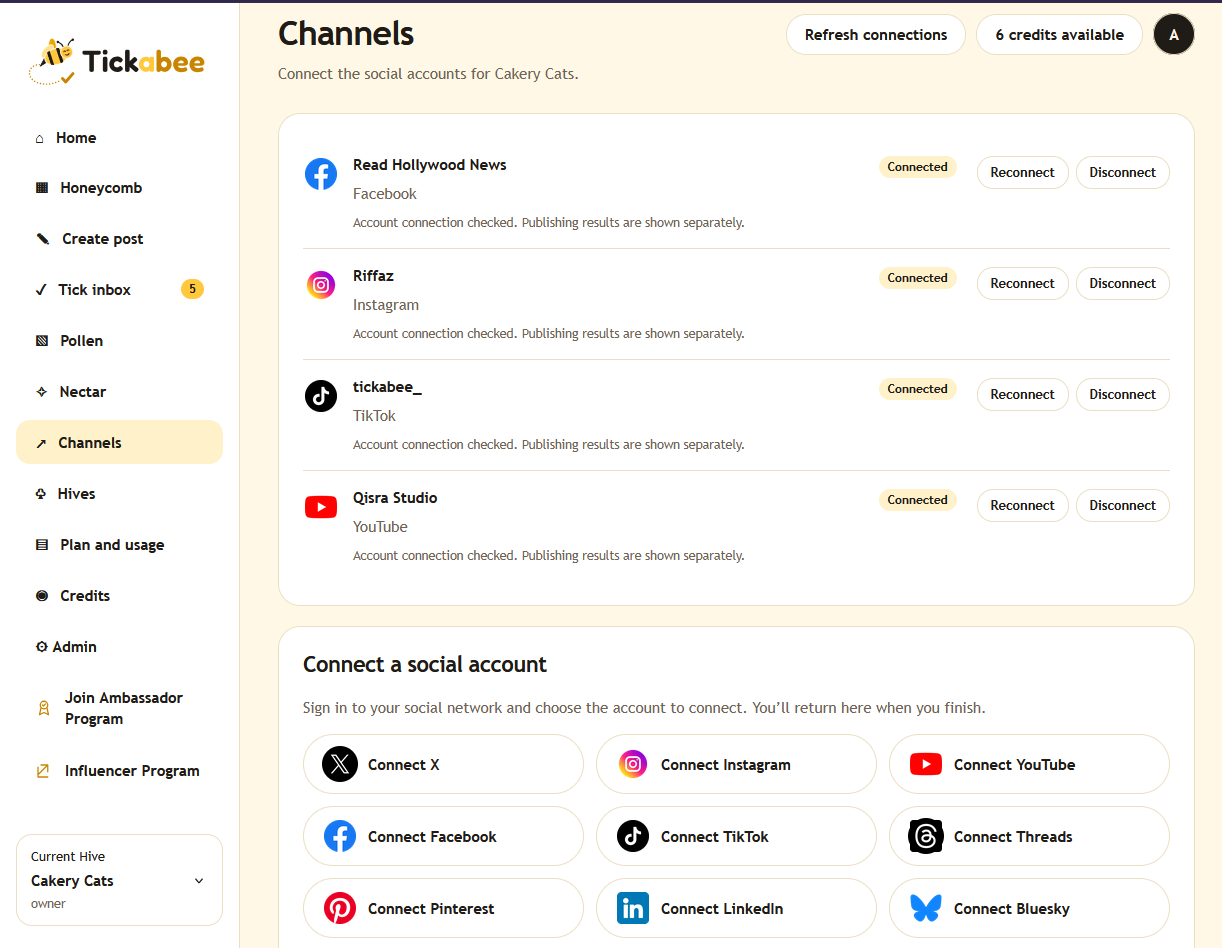
Use Channels to sign in with a social network and select the Page, profile or channel you want. You may see PostPeer, PostPeer-IG, PostPeerAPI or another app name, such as Social Media Integration, on the authorization screen. This is part of the connection flow started from Tickabee. Follow the permissions requested by that network. A connected status confirms the connection; it does not guarantee every post meets the network’s requirements.
A Facebook Page, Instagram account or YouTube channel each counts as one connected account. Published plan account limits are totals across your subscription’s Hives, not a separate allowance for every Hive.
Hive numbers are internal IDs, not the number of Hives in your account.
 View full size
 View full size
GUIDE 03
Connect your AI assistant
Bring ChatGPT or Claude into your workflow.
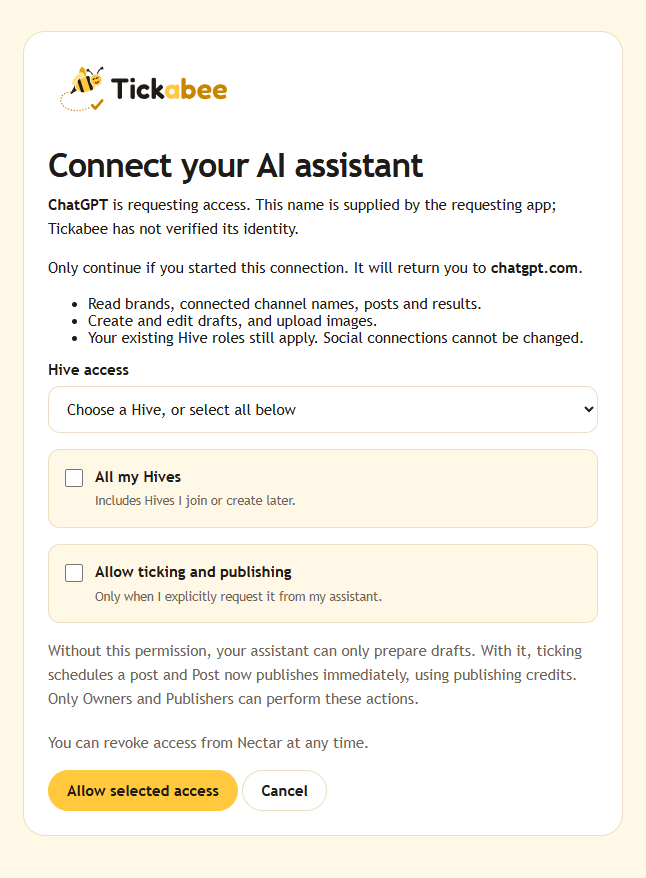
The Tickabee connection uses https://tickabee.com/mcp. Add or select Tickabee in your assistant’s connection settings, then follow the Tickabee sign-in and authorization screen.
- Sign in to the Tickabee account you intend to use.
- Choose one Hive, or grant access to all your accessible Hives. All-Hive access also includes Hives you later join or create.
- Enable Allow ticking and publishing only if you want the assistant to perform those actions when you explicitly request them.
- Approve access and return to your assistant. Check the accessible Hives before creating anything.
In Claude’s custom-connector setup, use OAuth with automatic registration and Streamable HTTP where those choices are shown. ChatGPT connection availability depends on the installation available to your account; a development connection is separate from a public directory listing.
Start with a read-only check
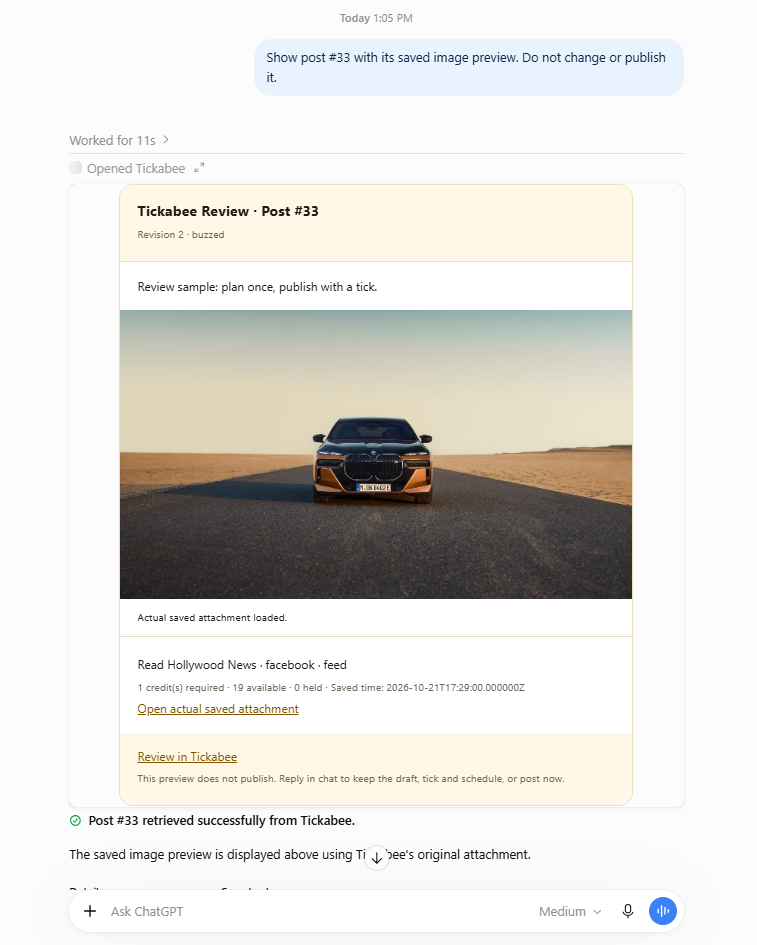
Use Tickabee to list my accessible Hives, connected accounts and publishing-credit balance. Do not create, edit, schedule or publish anything.
Your existing Hive role still applies. You can revoke assistant access from Nectar. Disconnecting an assistant does not delete drafts or remove published social posts.
 View full size
 View full size
GUIDE 04
Create and review drafts
Turn an idea into something you can approve.
Draft directly in Tickabee or ask your assistant to prepare a post using the selected Hive’s brand voice. Specify the exact account and format when you know them. Saving or editing a draft does not spend publishing credits.
Create without publishing
Use Tickabee to create an unscheduled draft in [Hive name] for [account name]. Caption: “[your caption]”. Show the saved preview and credit cost. Do not tick, schedule or publish.
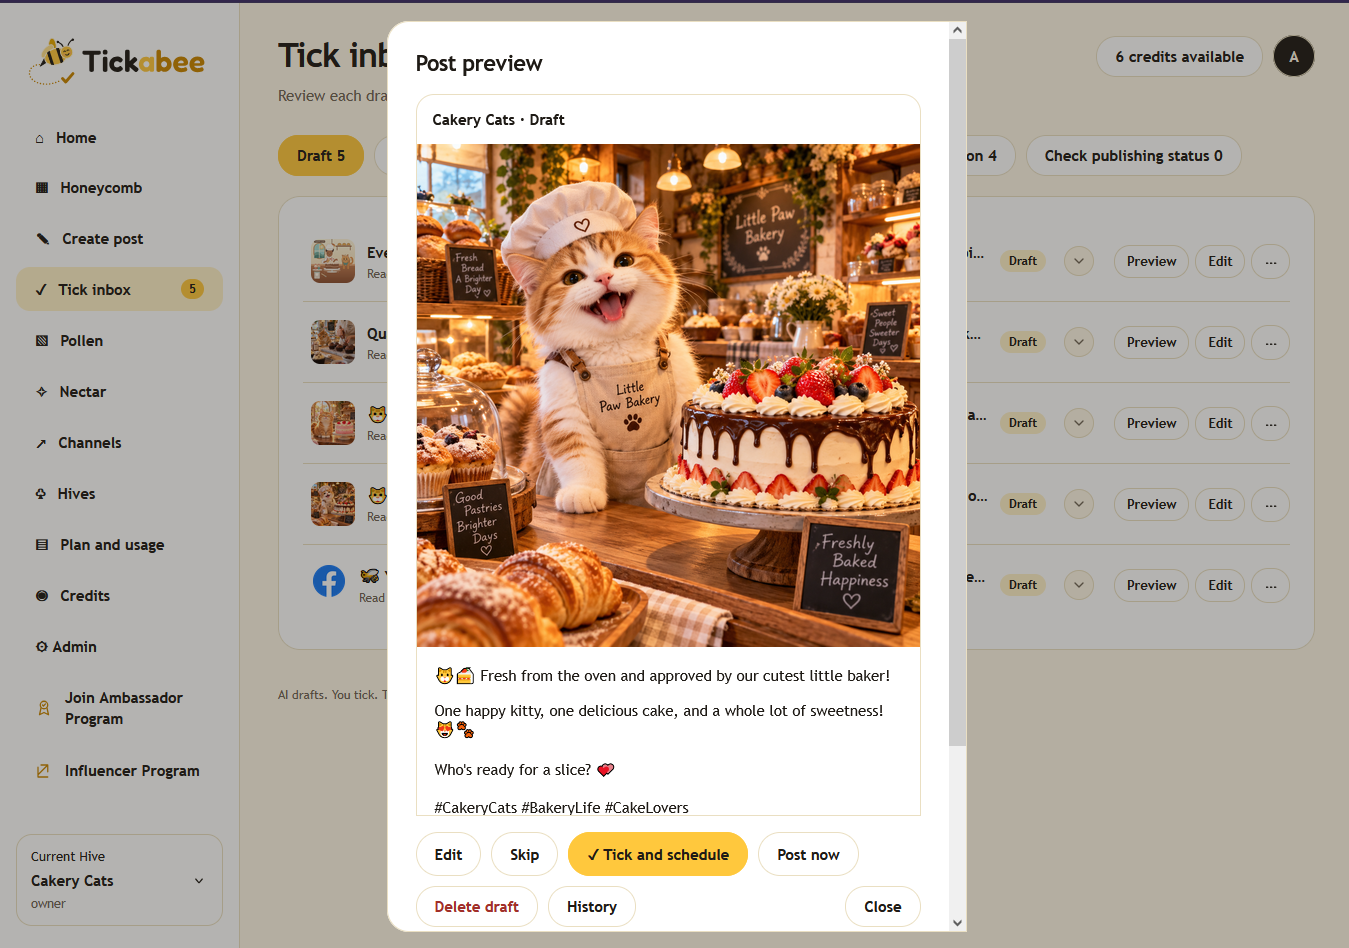
The preview should show the saved caption and actual attachment. Open the saved image or review the post in Tickabee if the embedded preview does not load.
Edits increase a post’s revision. Review the latest revision before approving it; an earlier approval should not be treated as permission for newly edited content.
 View full size
 View full size
GUIDE 05
Images, video and Pollen
Choose the final file, then attach it.
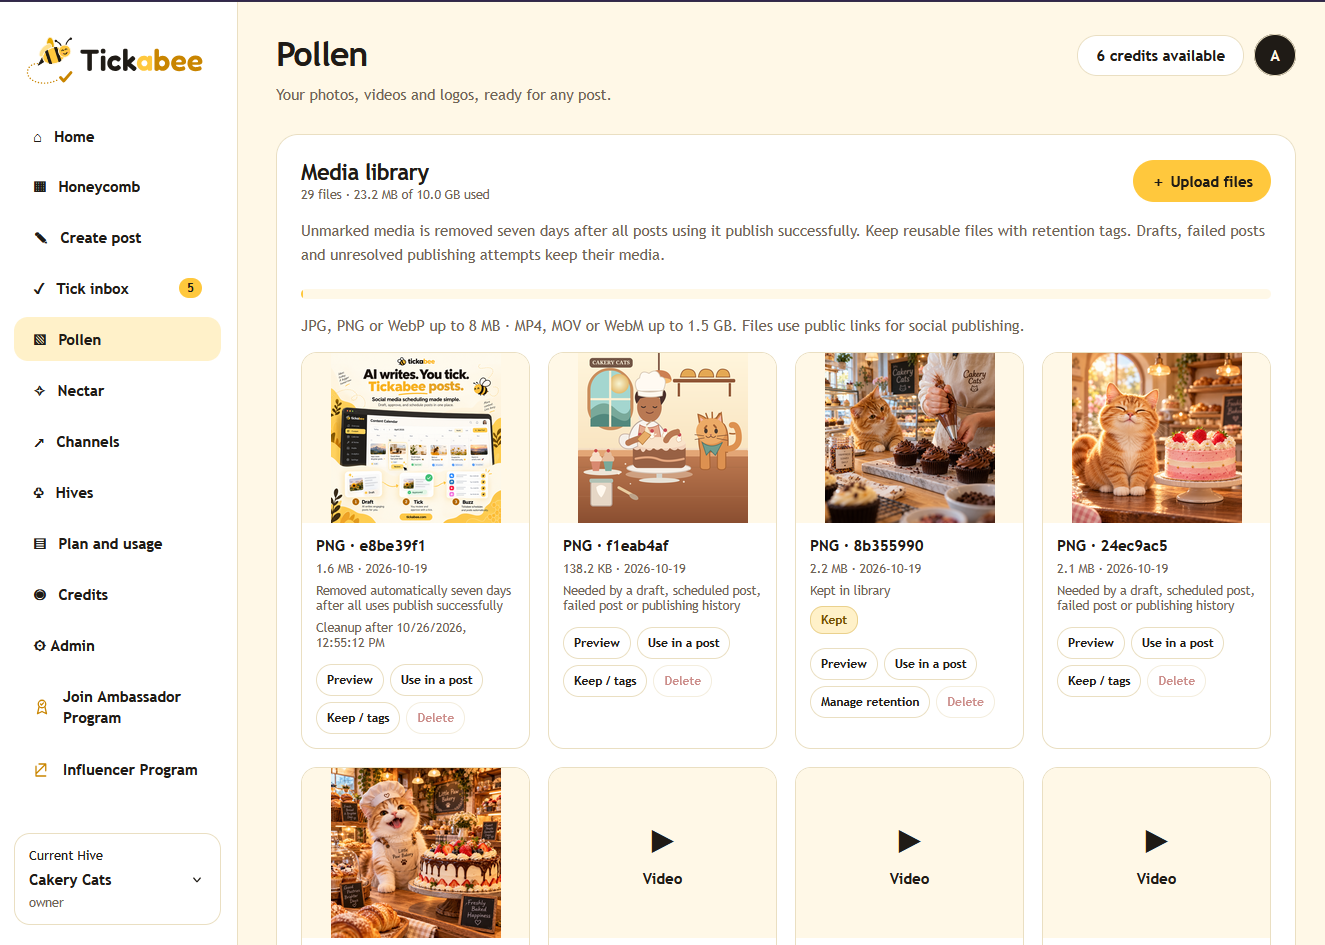
Pollen is your media library. Upload a file there, then choose Use in a post. Supported uploads and the current size limits are shown in the uploader. A social network can impose narrower format, duration or encoding requirements.
When working with an AI assistant, generate or refine candidates first. Select the exact final image before asking Tickabee to import it. Image generation depends on the assistant; the Tickabee connector stores and attaches images but does not generate them.
Images from ChatGPT
ChatGPT continues to use its existing image upload flow. Select the final image and ask Tickabee to import it into Pollen, then use the saved image in your draft.
Images from Claude
Give Claude a link to the image you want to use and ask it to save the image in Pollen and add it to your draft.
If Claude cannot use an image attached to your chat, upload it to Pollen yourself. Then ask Claude to use that image in your draft.
Try this in Claude
Use Tickabee to save this image in my Hive’s Pollen library and add it to my draft: [image link]. Show me the saved draft. Do not publish.
Use Keep / tags → Keep in library for reusable assets. Unmarked media can be removed seven days after all posts using it publish successfully. Drafts, failed posts and unresolved publishing results prevent that cleanup; unused uploads are not automatically removed by that rule.
 View full size
GUIDE 06
Schedule, publish and check results
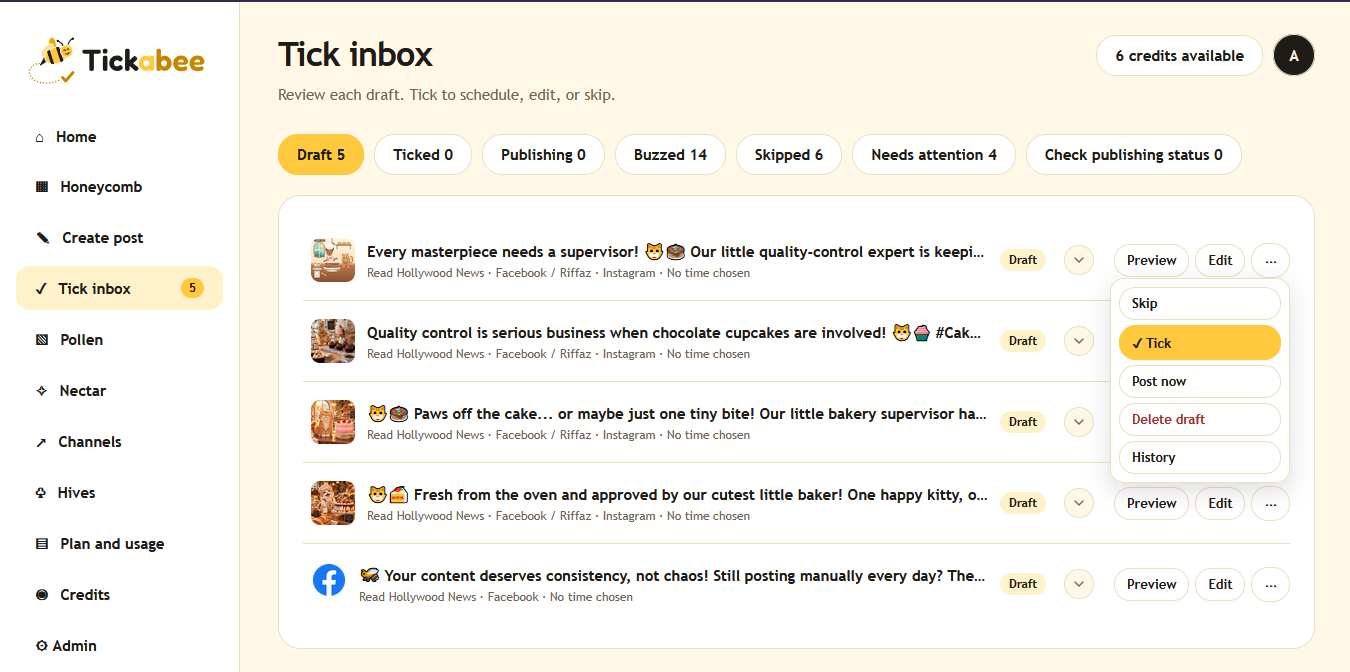
A tick is approval. Buzzed means published.
Choose a future time and Tick and schedule to approve a saved draft for that time. Check the Hive timezone and the displayed date. A draft with a suggested time is still a draft until approved.
Post now sends the reviewed revision immediately and uses publishing credits. In an AI conversation, explicitly confirm the post and latest revision after seeing its preview. Scheduling and immediate publishing require connection permission and an Owner or Publisher role.
Review before approval
Show the latest saved version of post #[ID], including its caption, image, destinations, time, revision and credit cost. Wait for my confirmation before scheduling or publishing.
- Draft
- Saved but not approved.
- Ticked
- Approved for the saved future time.
- Publishing
- Submission is in progress.
- Buzzed
- The post has a confirmed successful publishing result.
- Needs attention / uncertain
- Inspect each destination’s result before retrying.
 View full size
Retry failed destinations
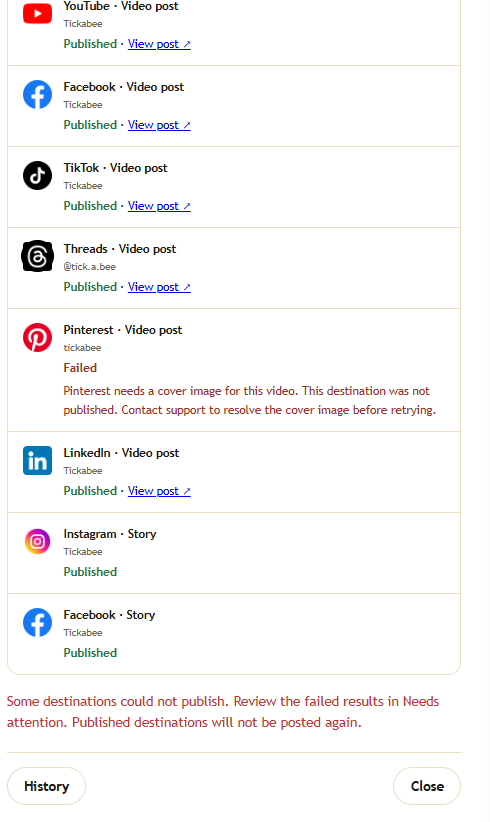
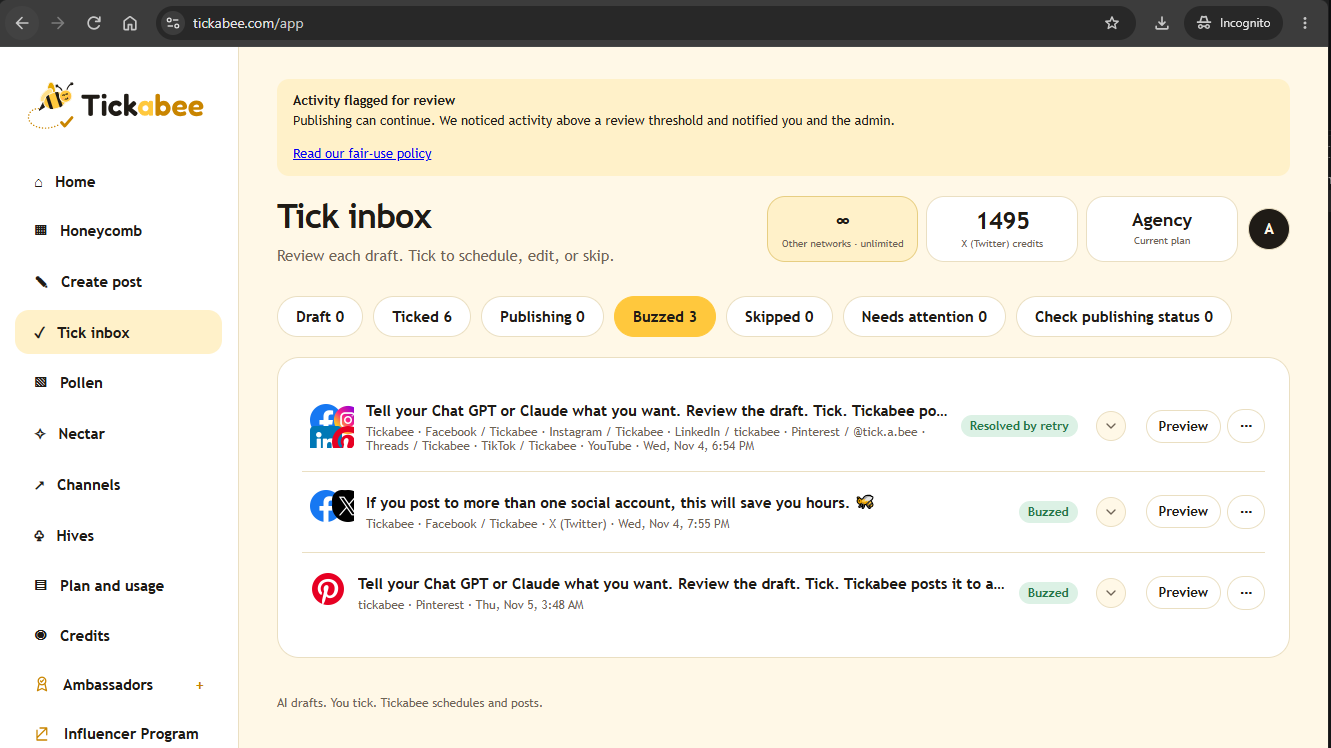
If only some destinations publish, you do not need to start the whole post again. Open Tick inbox → Needs attention, find the post and choose Preview. Each destination shows its own result and, when available, a link to the live post.
 View full size
- Check the latest results. Open the post’s ⋯ menu and choose Refresh result. If anything is still publishing or uncertain, wait and check again. A timeout does not mean the post failed.
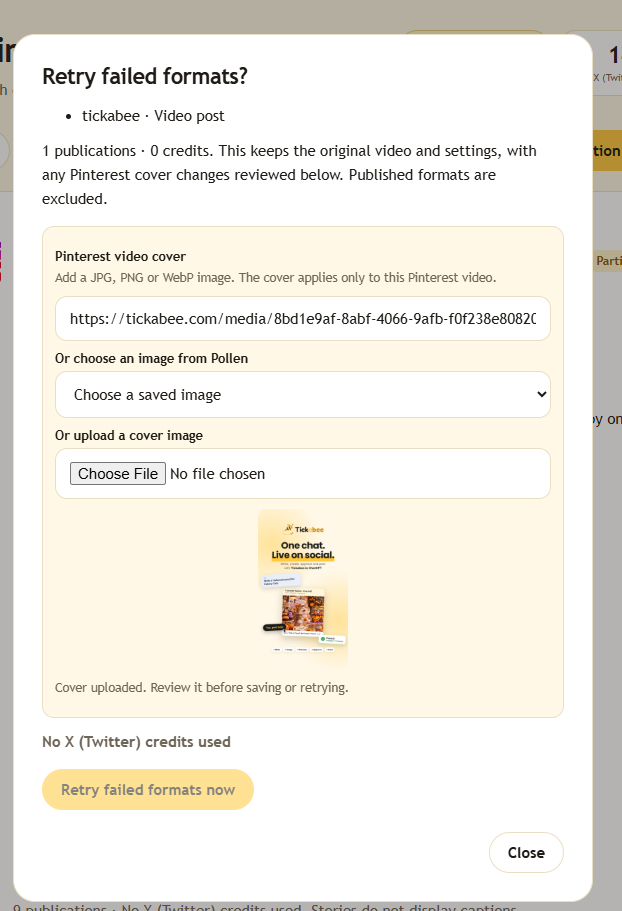
- Fix the reported problem. For example, reconnect an expired account in Channels. For a Pinterest video that needs a cover, you can add the cover in the retry window.
- Review the failed destinations. Choose Retry failed formats from the post’s ⋯ menu. This option is available to an Owner or Publisher once all destination results are confirmed and at least one has failed.
- Approve the retry. Check the destinations, any cover changes and the displayed X (Twitter) credit cost, then choose Retry failed formats now. This publishes immediately; it does not schedule a future retry.
 View full size
The retry appears as a separate post, linked to the original. If a retry already exists, open it to check its results rather than submitting the original again. The original attempt and its history are kept.
Once all previously failed destinations publish successfully on retry, the original shows Resolved by retry in Buzzed and Honeycomb. Open the retry post to see its successful result and live-post link.
 View full size
GUIDE 07
Understand publishing credits
Count destinations and formats, not just drafts.
Creator, Team and Agency include unlimited posts under fair use on Instagram, Facebook, LinkedIn, TikTok, YouTube, Threads, Pinterest, Bluesky and Google Business Profile. This covers your own brands and clients. X (Twitter) uses 5 credits per post, or 50 when the caption contains an http:// or https:// link. Check the displayed cost before approving.
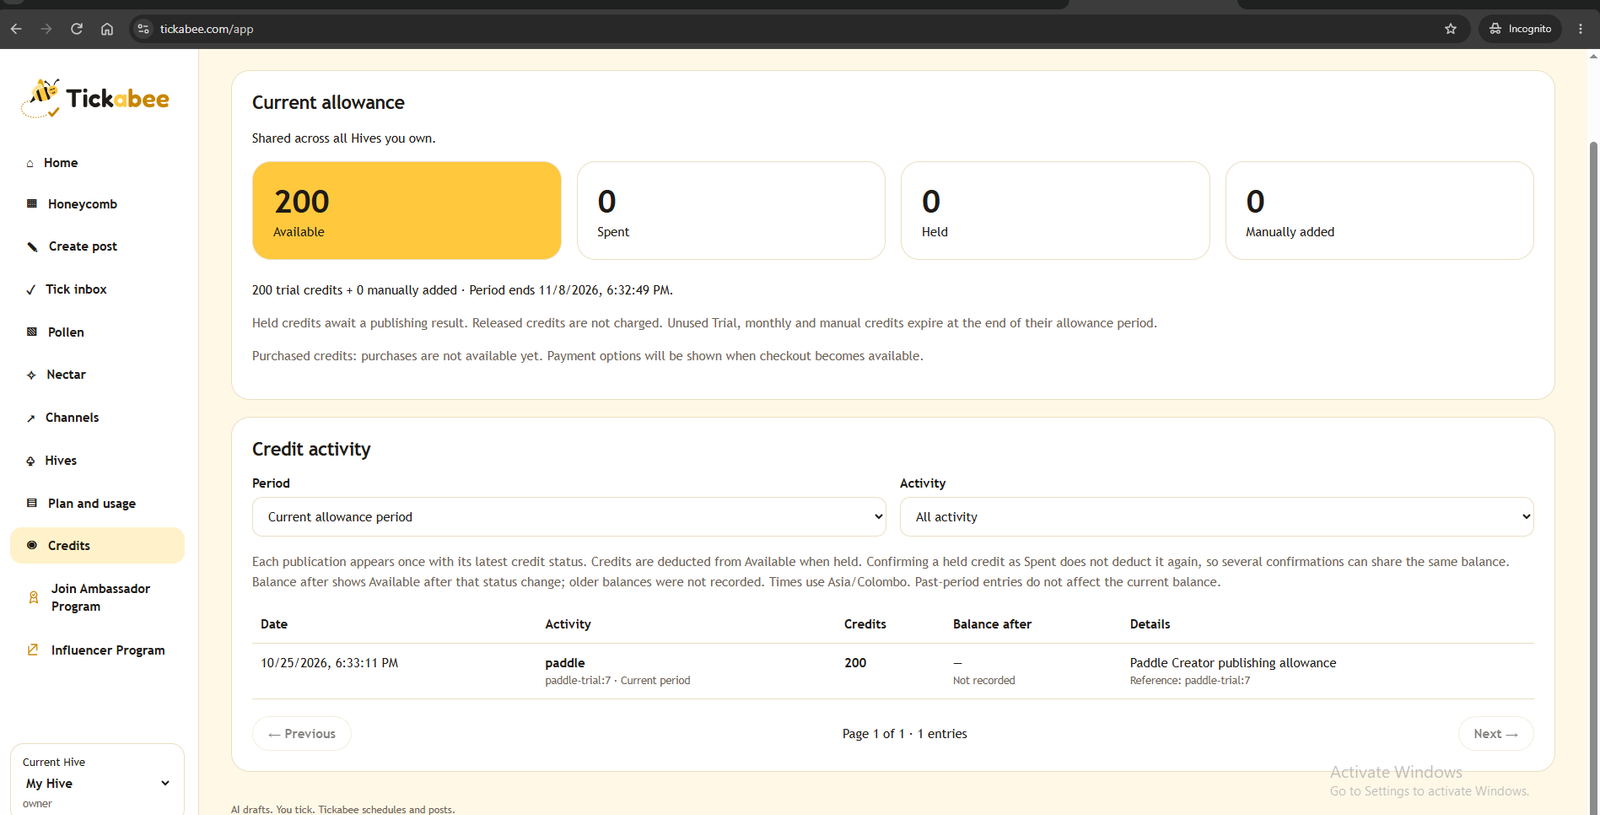
Credits shows your account’s allowance and activity across Hives you own. Posts in a Hive owned by someone else use that owner’s allowance, not your personal credits. The page explains the difference when you are viewing someone else’s Hive.
- Available: credits you can currently use.
- Held: reserved while a publishing result is pending, already deducted from Available.
- Spent: used by confirmed publications.
- Released: returned after a failed publication.
Free includes 100 publications per calendar month across the account owner’s Hives. Paid plans and their 14-day trials include unlimited posts under fair use on the supported non-X (Twitter) networks listed above. Only X (Twitter) publications deduct credits. Free has a separate monthly publication allowance. Previous credit history remains available; analytics does not currently use credits. Unused ordinary monthly and trial credits do not roll over. Buying additional credit packs is not available yet.
Upgrading raises the current allowance to the higher plan’s limit while keeping used and held credits counted. It does not add a second full allowance or move the monthly credit reset date. Downgrading keeps the current period’s allowance; the lower allowance applies next period.
Check the allowance expiry and activity filters in Credits. A trial allowance may appear as a Paddle entry in the activity history. Scheduling does not guarantee credits will still be available at publication time.
 View full size
For plan limits, trial expiry and payment steps, see Trials and subscriptions.
GUIDE 08
Trials and subscriptions
Try a plan, continue after the trial, or start paying today.
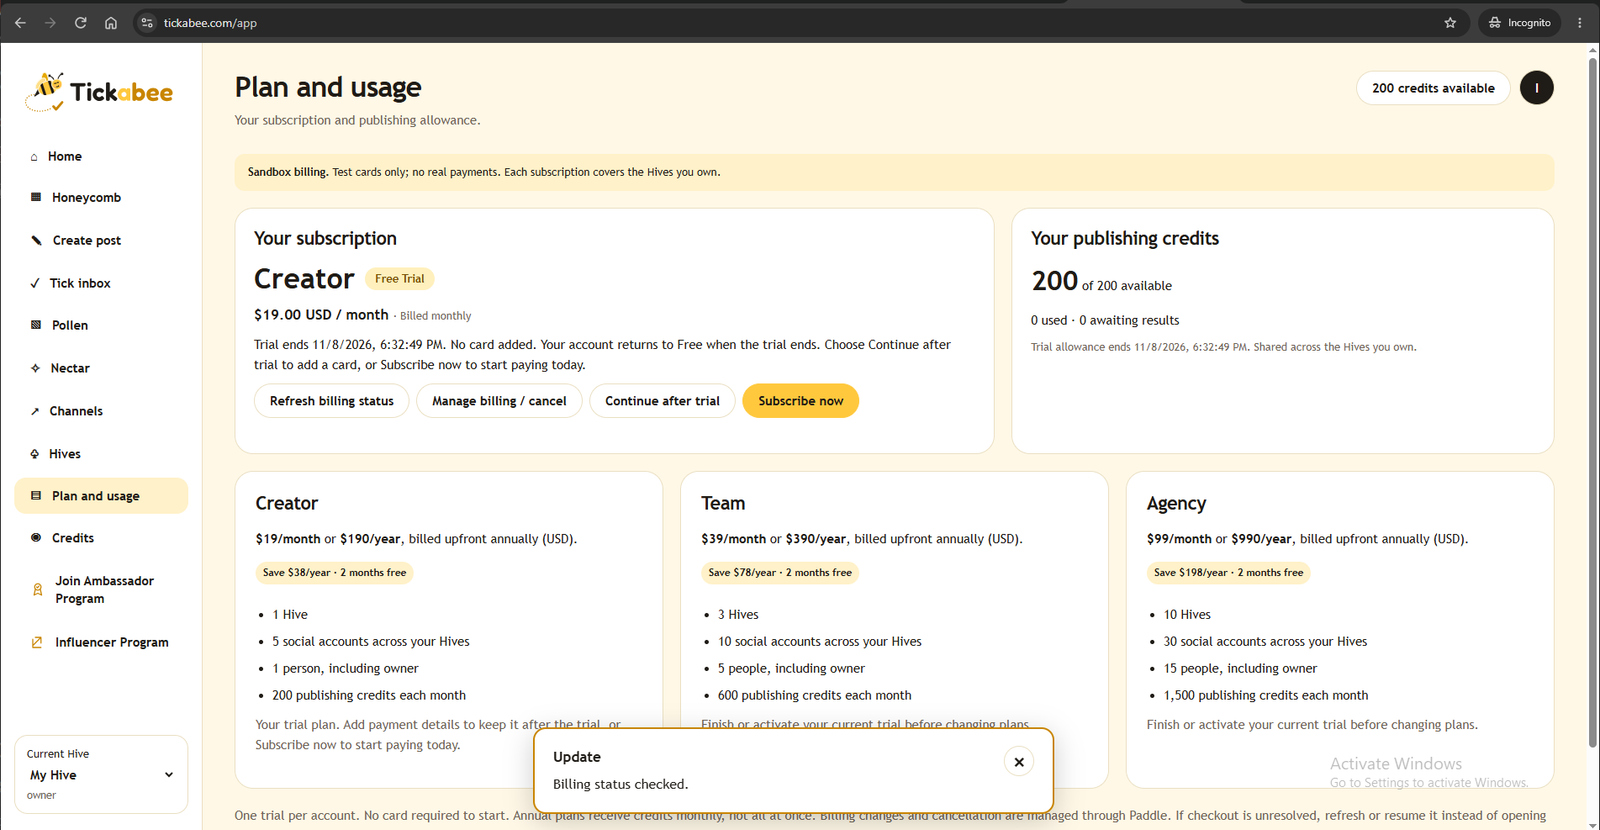
Open Plan and usage to see your plan, status, billing interval, renewal or trial end date, and publishing credits. The Active badge means a paid subscription is active; Free Trial means you are still in the trial.
Choose how to start
- Stay on Free: use 1 active Hive, 2 connected social accounts, the owner only and 100 publications per calendar month across your Hives.
- Start a 14-day trial: try unlimited posts under fair use on the supported non-X (Twitter) networks and the selected plan’s workspace limits without adding a card. There is one plan trial per account.
- Subscribe without a trial: choose the monthly or annual link below a plan’s trial button. Paddle shows the price and recurring terms, collects payment details and takes payment when you confirm.
Monthly prices are Creator $19, Team $39 and Agency $99 USD. Annual prices are $190, $390 and $990 respectively, billed upfront: the price of 10 months for 12 months of access. Paddle shows the final amount and applicable taxes. Annual billing still allocates publishing credits monthly.
Start your no-card trial
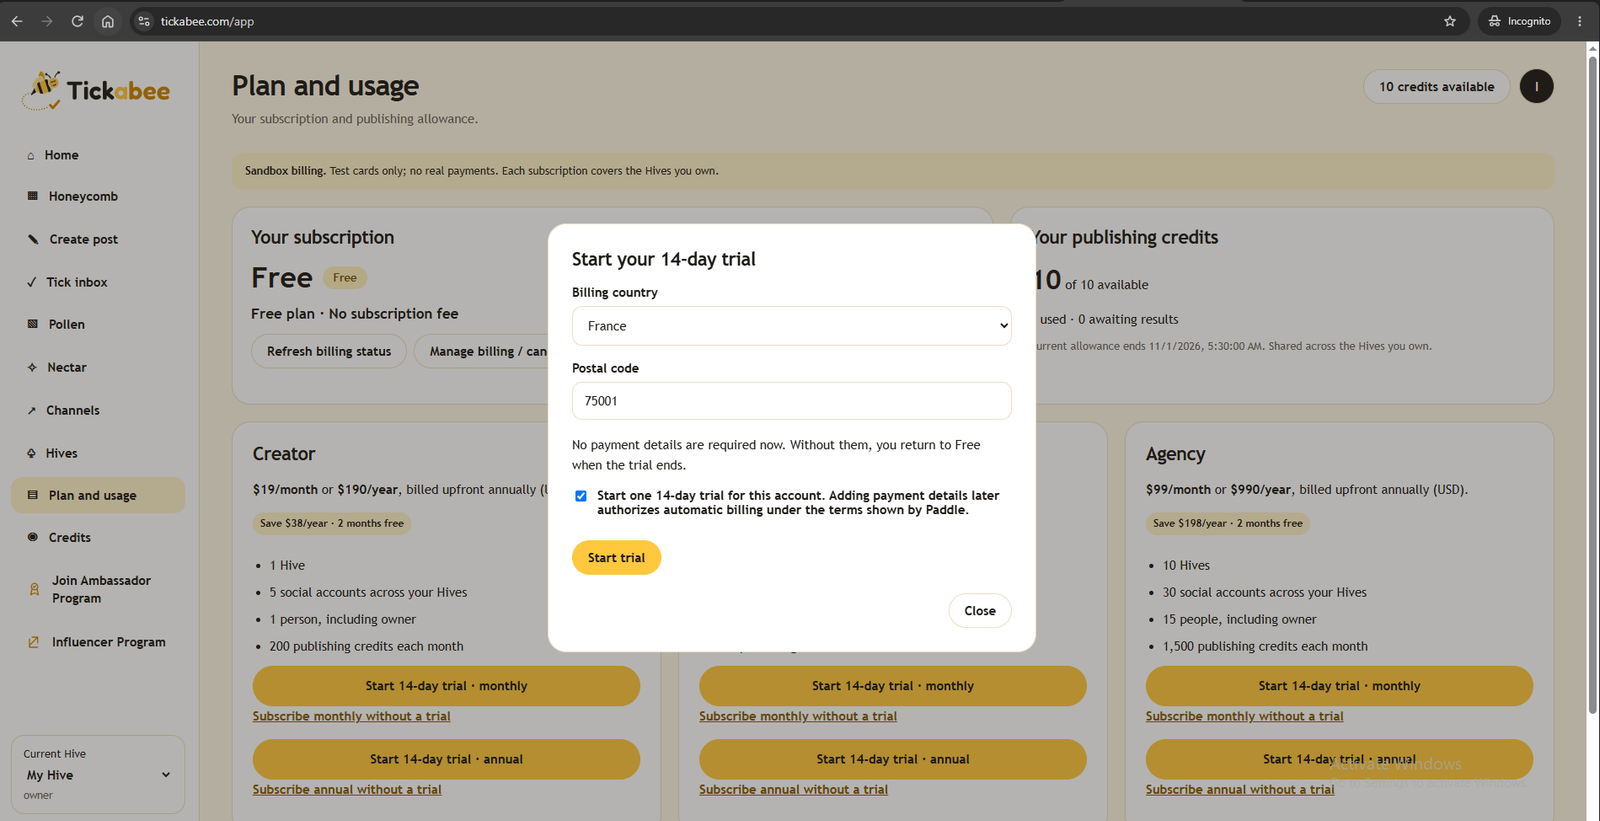
- Choose Start 14-day trial · monthly or annual on the plan you want to try. The interval is the billing choice if you later continue that subscription.
- Select your billing country. Enter a postal code if the field appears; requirements depend on the country. For example, France requires one, while Sri Lanka does not.
- Read the trial terms, tick the consent box and choose Start trial.
- Wait for activation. If the page still says pending, choose Refresh billing status; do not start another trial.
 View full size
 View full size
Keep the trial and pay when it ends
- Choose Continue after trial.
- Save your payment details securely in Paddle and approve its recurring terms. This card-collection step is $0 today.
- Return to Tickabee. You should see confirmation that payment details are saved and the trial continues.
Your subscription starts automatically at the trial end under the terms shown by Paddle, unless canceled. Update payment details lets you change the saved card.
Subscribe now and end the trial early
- Choose Subscribe now while on your trial.
- If no card is saved, Tickabee opens Paddle to collect it. Complete that step. If a card is already saved, you go straight to the next step.
- You return automatically to Review and start your subscription in Tickabee. Review the amount due today and the recurring price.
- Tick the approval box and choose Pay [amount] and subscribe. This ends the trial and starts paid billing immediately.
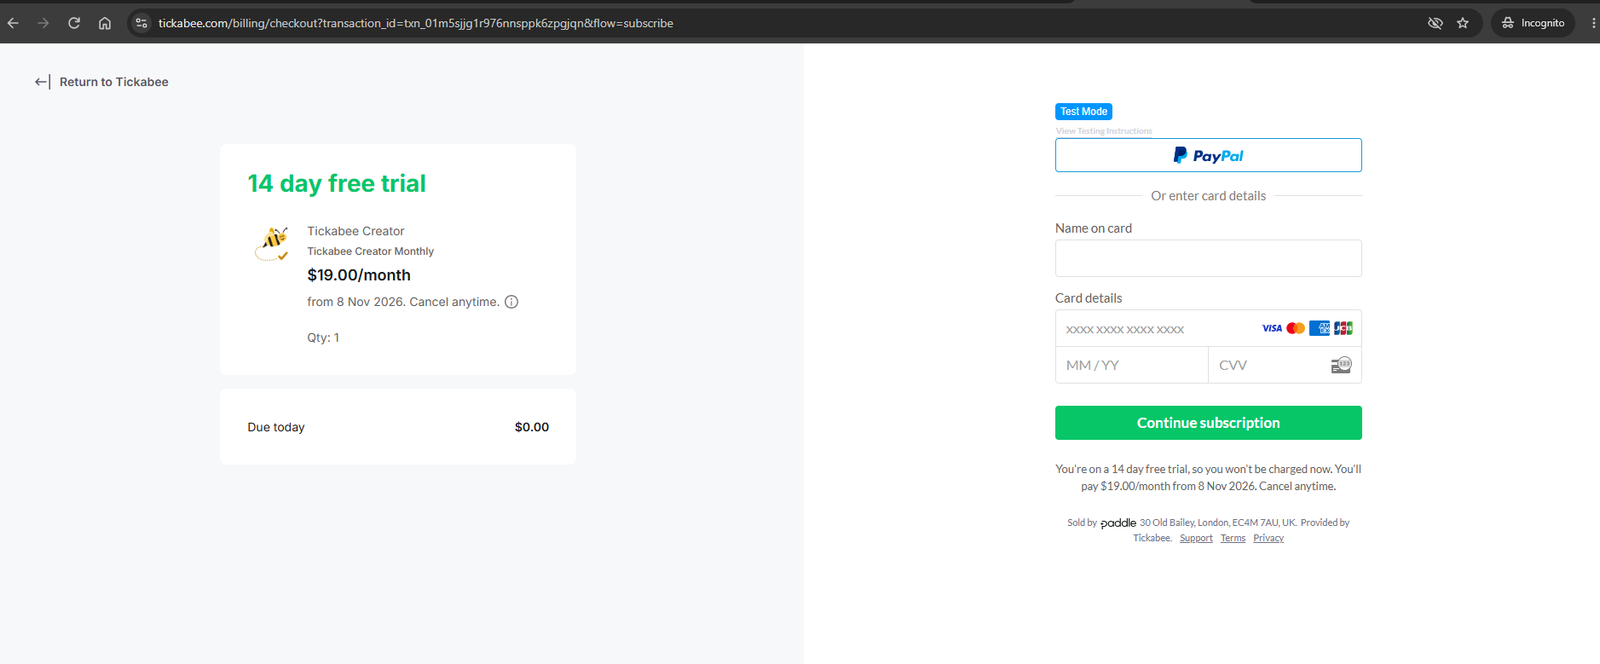 View full size
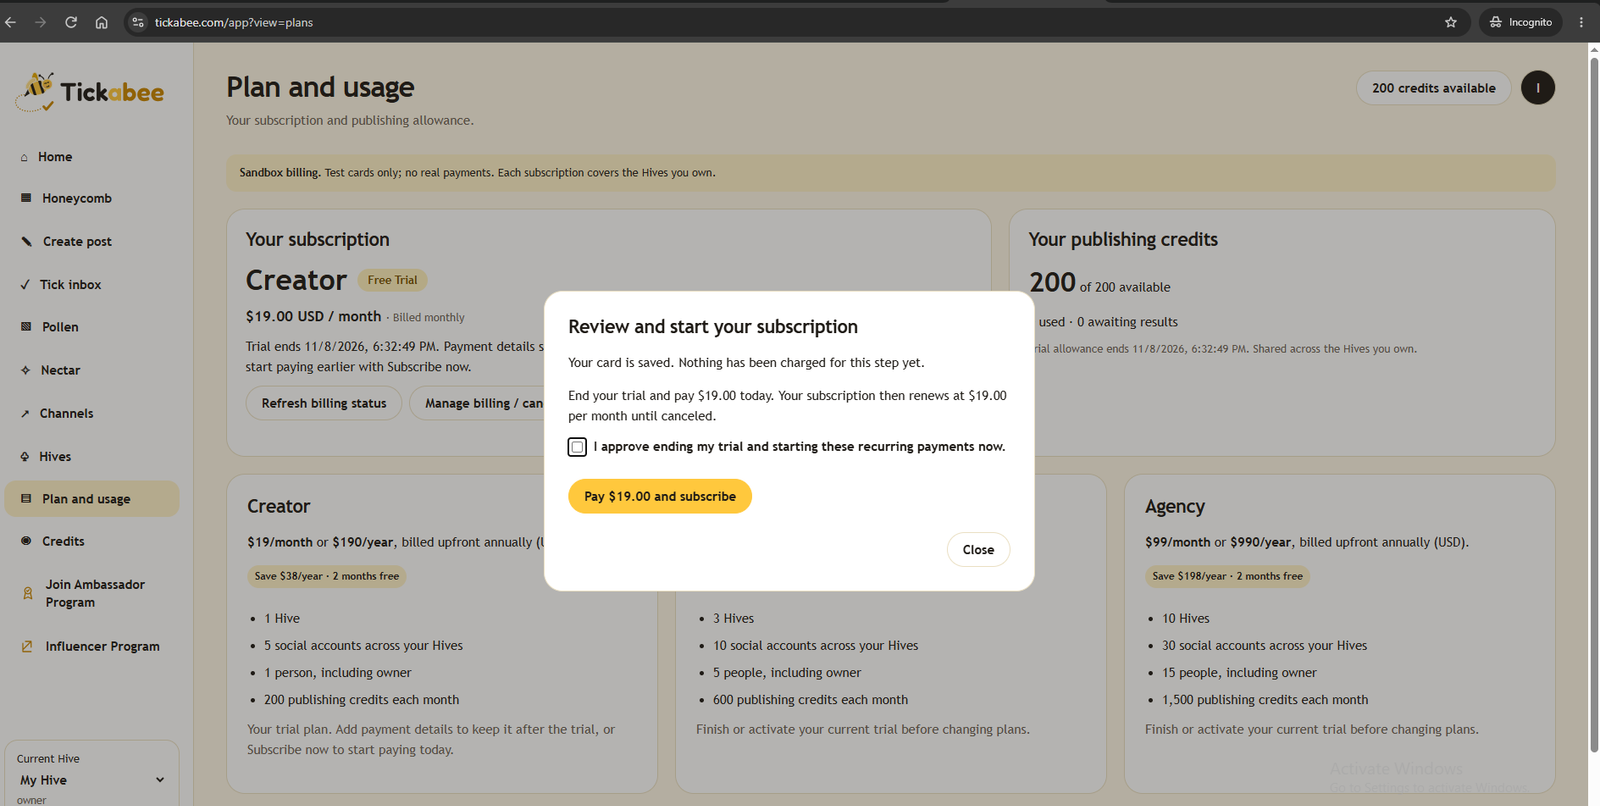 View full size
Check the result
After payment is verified, Plan and usage shows your plan with an Active badge, billing price and next renewal date. Tickabee sends a subscription confirmation to your verified account email, normally within a minute. Paddle provides the payment receipt. Check Spam if an email is missing.
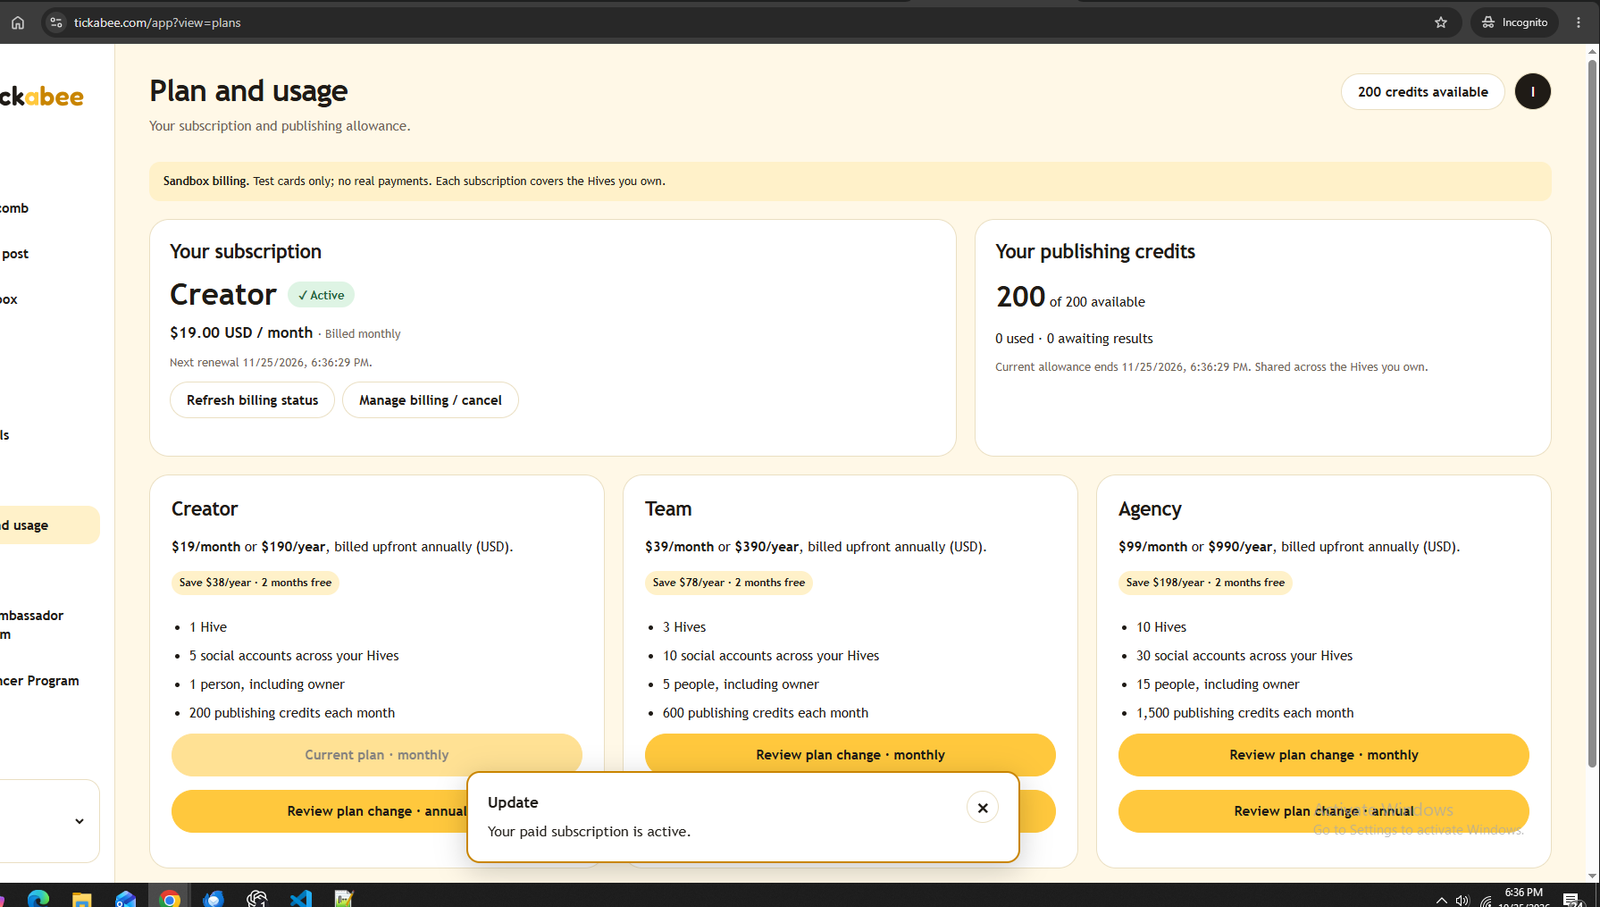 View full size
Change plan, cancel or let the trial expire
For an active subscription, choose Review plan change for another plan or billing interval. The review shows the immediate prorated amount, recurring price and credit effect. Read it and confirm only if you want the change. An existing trial can be activated first and then changed; do not create a second subscription.
Choose Manage billing / cancel to open Paddle’s portal for invoices, payment management or cancellation. Read the effective date shown there: a trial cancellation can end access immediately, while other changes may take effect at the period end. Return to Tickabee and refresh billing status.
If the trial ends without a saved payment method, you return to Free without a charge. Free limits apply: 1 active Hive, 2 usable connected accounts and the owner only. Extra Hives become read-only, extra channels cannot publish and existing teammates become read-only. Saved content is preserved. Archive Hives or disconnect accounts to choose which ones remain usable.
If an update is still processing, use Refresh billing status. Resume an existing pending checkout if available rather than opening another. A return URL or closed checkout is not proof of payment. Contact hi@tickabee.com if the state remains unresolved.
GUIDE 09
Work with a team
Use the right role for each person.
Invite collaborators through the Hive’s Team tab. Each Hive has its own membership and permissions.
- Owner: manages the Hive and its settings.
- Publisher: can review and approve publishing.
- Editor: prepares and edits drafts without publishing approval.
- Viewer: reads the workspace without editing.
Assistant publishing permission does not override Hive roles. Choose the narrowest role and assistant access that fits the person’s work.
GUIDE 10
Grow with Tickabee
Two ways to take part.
Ambassadors
Active Ambassadors receive complimentary lifetime access for their own brand, with unlimited non-X (Twitter) posts under fair use. Current complimentary limits are 1 Hives, 5 connected accounts, 2 people including the owner, and 100 X (Twitter) credits each calendar month. These limits are controlled by the program administrator; unused monthly X (Twitter) credits do not roll over. Applications require manual approval, and genuine feedback and monthly participation requirements apply.
- For client work: purchase Team or Agency. Active Ambassadors can email hi@tickabee.com for a 50% discount code before purchasing. Apply it in Paddle checkout and check the discounted price and recurring-payment terms before confirming. The discount does not apply to Creator.
- After purchase: your Ambassador membership remains active, but the paid plan’s Hive, account, people and monthly X (Twitter)-credit limits replace complimentary benefits. The allowances do not stack: you do not get an extra Ambassador Hive or extra monthly Ambassador X (Twitter) credits. Participation requirements continue.
- After paid access ends: complimentary own-brand benefits resume if your Ambassador membership is still active. Otherwise, your account returns to Free. Canceling a renewal normally leaves paid access in place until the end of the paid period.
- If your limits become lower: saved Hives, posts and history remain. Excess Hives become read-only, extra social accounts cannot publish, and extra teammates have read-only access. Archive Hives or disconnect accounts to choose which fit within your current allowance.
- If Ambassador benefits end first: an active paid subscription continues separately. Contact support about your discount eligibility.
Influencers
Approved Influencers receive complimentary lifetime access while their Influencer benefits are active: one Hive, ten connected accounts and two teammates plus the owner. Publish unlimited posts to supported networks other than X (Twitter), under fair use, without spending credits.
Earn X (Twitter) credits through content: one approved original publication, in any content format, earns 1,000 X (Twitter) credits for the following UTC calendar month. Program approval alone does not award credits. Without approved content there is no following-month reward, but unlimited non-X (Twitter) publishing remains available while benefits are active.
- X (Twitter) usage: each post uses 5 credits, or 50 if its caption includes an http:// or https:// link. Each selected destination and format is counted separately. Drafts and edits do not use publishing credits.
- Expiry: reward credits expire at the end of their reward month and do not roll over. Purchased credits are separate. You need enough available credits to publish to X (Twitter); running out does not stop publishing to the other supported networks under fair use.
- Referrals: earn commissions on eligible paid subscriptions billed through Paddle. Referral commissions are separate from content rewards.
Check the linked program pages for eligibility, current limits, approval requirements and complete terms.
GUIDE 11
Troubleshooting and support
Find the next useful step.
The assistant shows the wrong Hive
Check which Tickabee account authorized the connection and ask the assistant to list accessible Hives. Reconnect with the intended account if needed. A Hive’s numeric ID is not its count.
A tool is missing
Check the connection’s permissions and refresh its tools where your assistant supports that action. Start a new conversation. Publishing tools also require permission granted during Tickabee authorization.
The saved image preview does not load
Open the saved attachment link or review the post in Tickabee. Check that the real file was stored, then refresh the assistant’s connection if it has older tool metadata. Share the error with support if it continues.
A post is pending, failed or partially published
Open the post’s per-destination results. Do not resend a pending or uncertain publication. Correct the reported problem, then use Retry failed formats for confirmed failed destinations only. Successfully published destinations are excluded. If a retry already exists, open that retry to check its result.
I want to request deletion or a refund
Email hi@tickabee.com from your account address. Read the Privacy Policy and Refund Policy for details. Refunds can be requested within seven calendar days of payment. No successful publications during the paid period means a full refund. If publishing has been used, the refund is based on unused subscription time, minus X (Twitter) publishing costs already incurred, with a minimum refund of zero. Earlier purchase terms and mandatory refund rights remain protected.
Still need a hand?
Email hi@tickabee.com with your Hive name, post ID, timezone and visible error. Never send passwords, access tokens or full card details.
Contact support →